An Example of Component & User Interface Design
How to Create UML Diagrams, Testing Plans, and User Interface in Software Engineering

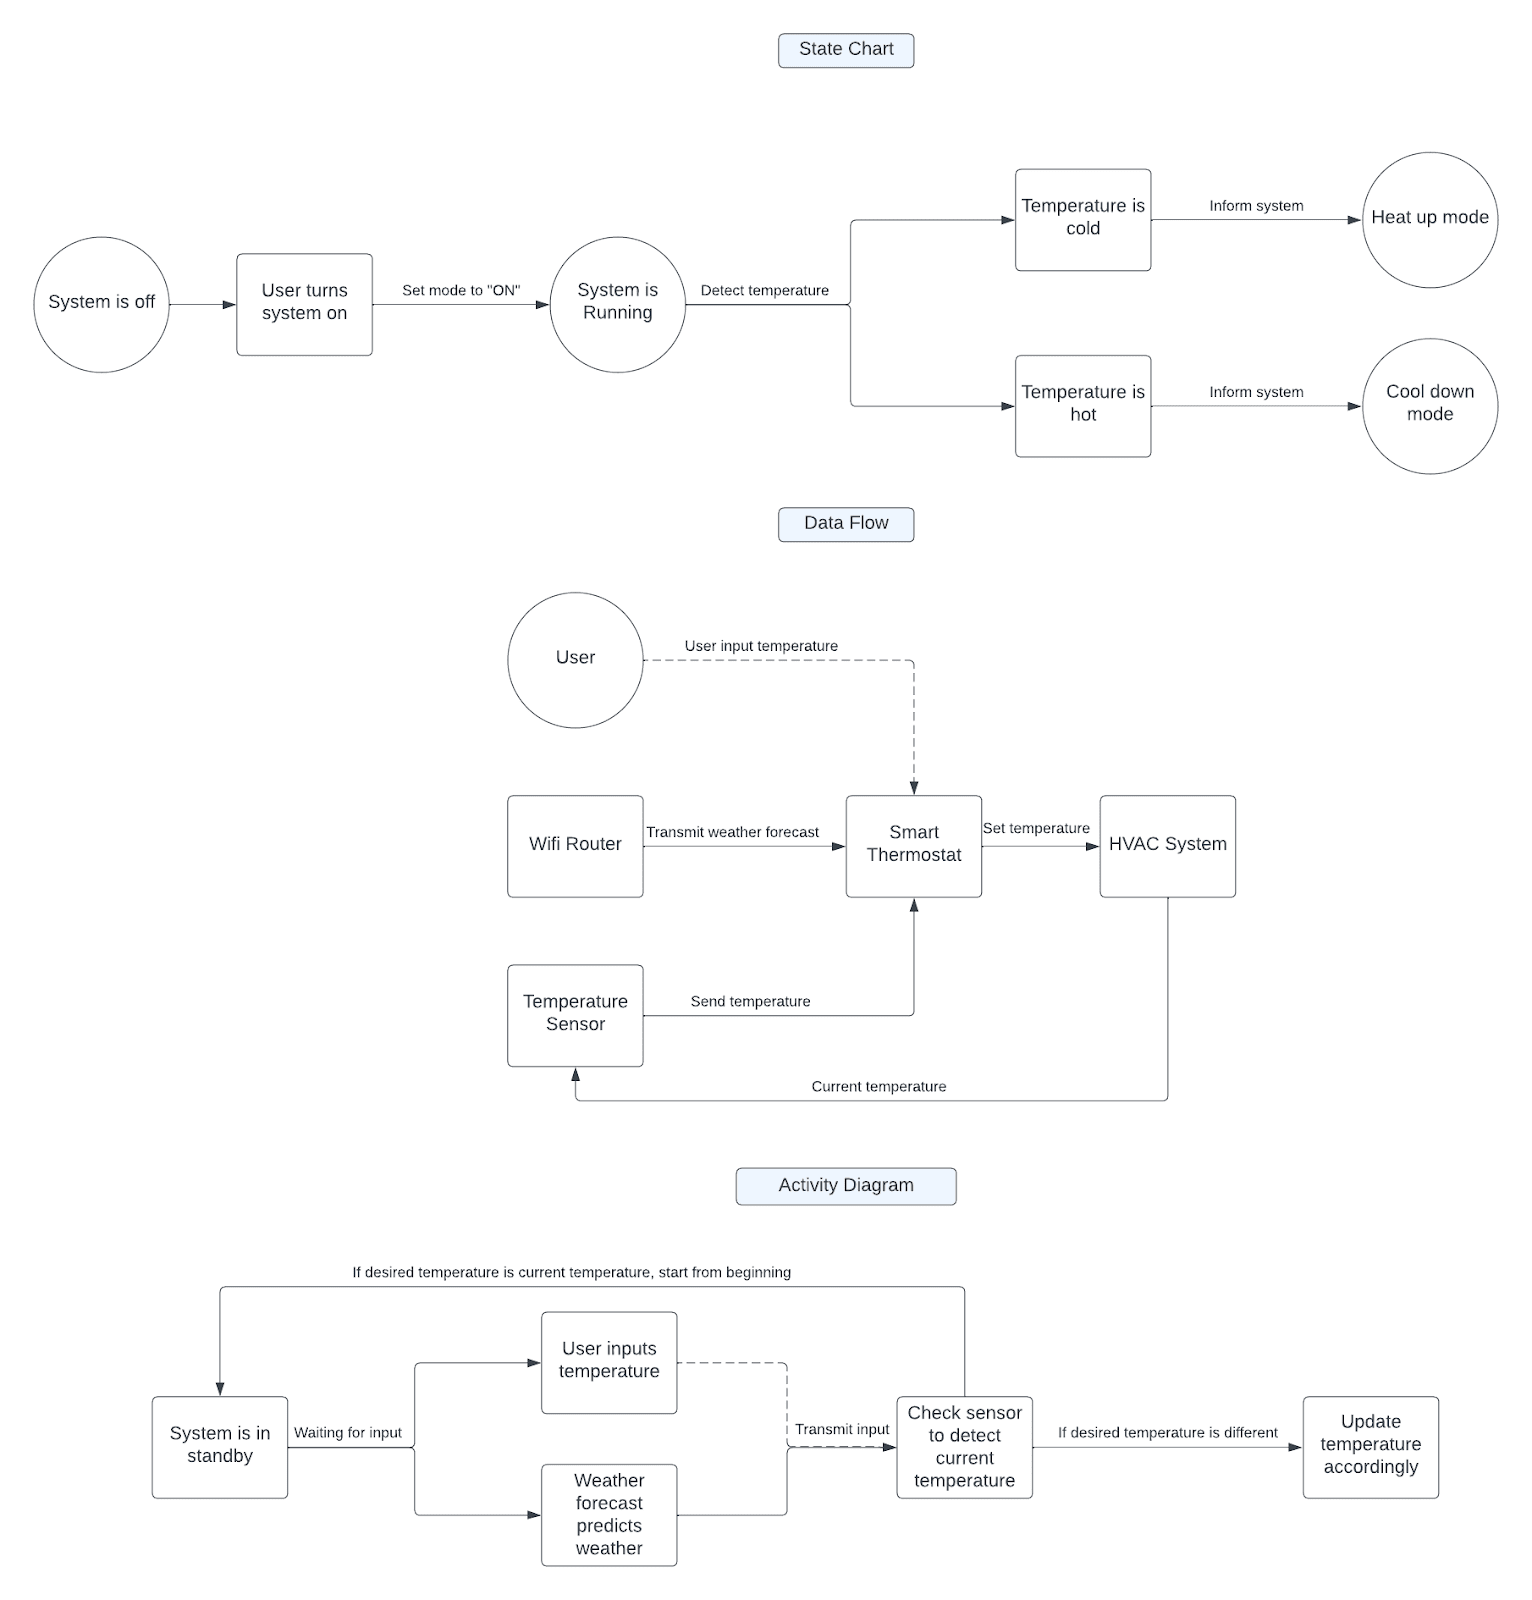
State chart, data flow, and activity diagram

User interface design with labels
Interface Description for Smart Home Thermostat
The user interface of the smart home thermostat is designed to cater to a broad spectrum of users. To achieve this goal, the interface must be simple and efficient, with minimal buttons and menus, while still providing essential features. This minimalist approach will also enable the company to reduce development time and achieve faster turn-around times. The interface will include three critical elements: manual temperature setting, automatic weather forecasting, and heating and cooling mode displays.
Manual Temperature Setting
The temperature display will default to Fahrenheit to align with the United States market. A white Sans Serif font will be utilized to display the numbers, with a charcoal grey background to ensure a clean, stylish look. The temperature will have a little "F" icon on the top right, and when clicked it will turn into a “C” to differentiate between fahrenheit and celsius. The temperature change function will be performed via an up or down arrow on the left-hand side of the display, and the time will be shown in the upper left-hand corner for users convenience.
Automatic Weather Forecasting
The weather forecasting page will display the option to activate weather forecasting and allow the user to set the zip code for the location. A clean and straightforward interface with a uniform color scheme will also be used here, with the on/off switch on the top left and the zip code on the top right of the screen. The display will include the temperature, cloud/sun status, and the likelihood of precipitation for the current day.
Heating and Cooling Modes
The heating and cooling modes of the smart thermostat system will automatically display whenever the device is functioning. The interface will maintain a white and charcoal grey color scheme with the addition of orange and blue colors. The color red will indicate heating mode, with the numbers turning red, and small text beneath the numbers will display "Heating". Similarly, in cooling mode, the numbers will turn blue, and a small text beneath will display "Cooling".
Class Based Component Design
A component is the basic building block for a software application or system that is being designed (Component-Level Design: Definition & Types, 2021). Class based component design is a functionality that is used in object oriented programming languages. Class based component design adds increased organization and scalability to projects, as it allows the programmer to have modular code that can be reused in certain situations within the same system. Breaking down the smart-home thermostat system into separate classes will provide an enhanced user experience, and also give more flexibility to the programmers developing it. Each component within the smart-home thermostat system can be broken down into separate classes, such as the thermostat itself, the temperature sensor, and the heating and cooling modes. This will provide a flexible scalable operation that can be easily implemented.
Testing Plan
The testing plan for this smart home thermostat will be extensive to ensure that all features are functional and that our smart home thermostat will be a success. As we are using the agile methodology, testing will regularly take place throughout the software development life cycle, and we will also include a final test that will happen before launch. We are also going to include several rounds of user testing, to ensure that our design works well across a large range of audiences. Each component will be tested separately, before an all inclusive test will take place.
The first rounds of testing will take place when we have successfully developed a minimum viable product for each component. The first component that will be tested is the thermostat system, which is to include the manual setting, weather forecasting, and correct display of the temperature. Following this, the temperature will undergo rigorous testing to ensure that it is giving precise and real time measurements of temperature. And finally, the heating and cooling modes will be tested across several different HVAC systems. Unfortunately due to limitations in budget, scope, and time, we are not able to test the device across every single HVAC system that could exist within a user's home, so we are going to test on the top three most commonly used systems in the United States. It is also difficult to test the long term reliability of the thermostat, as the best we can do at this time is simulations. In order to ensure the long term reliability of our thermostat, we must build a quality product without cutting corners. This will give us our best shot at longevity.
At the same time that these tests are taking place, we will begin user testing on our MVP. Here users will be able to test out the device and give their input on its design, operation, and functions. The users we select will encompass a wide range of gender, ethnicity, and age, in order to give us an accurate representation of the average American that will be using our system.
Once the tests have been completed and passed by our smart home thermostat system, and the user feedback is overall positive, our device will be ready to be launched.
User Interface / Testing Justifications
Our goal with the smart home thermostat is to provide a temperature system that is intuitive to use and that can meet or exceed the expectations and needs from our users, while still remaining profitable for the company. The system that we have modeled minimizes the amount of taps that are needed in order to use the systems functions, such as heating and cooling (Practical Application for Software Engineering: User Interface Design, 2018). The proposed user interface was kept simple to ensure that most users would be able to understand how to use the device without the need of a manual or built in tutorials. Creating a design that is simple, such as adding the arrows to represent turning the heat up or down, makes it easier for the brain to understand and increases user satisfaction (Johnson, 2021). By keeping the design simple, it also allows a faster turnaround time for development. Less elements to design and test mean savings for the company as well as increased scalability for potential future updates.
The outlined testing plan was designed with the end user in mind. In order to ensure the best possible customer satisfaction, it is necessary to conduct extensive user testing with focus groups representing a sample of the average American. The proposed testing plan is rigorous to ensure that our product meets the highest standards of quality, and there will be no unknown bugs or issues at launch. We have a low risk tolerance, as any bugs or misshapps could deter users from continuing to support our company (Spillner et al., 2014). Creating a product that passes these tests will also help its longevity, even if this is something that cannot be fully tested at this time.
References
Component-Level Design: Definition & Types. (2021, January 17). Retrieved from https://study.com/academy/lesson/component-level-design-definition-types.html.
Practical Application for Software Engineering: User Interface Design. (2018, June 22). Retrieved from https://study.com/academy/lesson/practical-application-for-software-engineering-user-interface-design.html.
Johnson, J. (2021). Designing with the mind in mind simple guide to understanding user interface design guidelines. Morgan Kaufmann.
Spillner, A., Linz, T., & Schaefer, H. (2014). Chapter 4: Test Techniques. In Software testing foundations: A study guide for the certified tester exam: Foundation Level, ISTQB compliant. essay, Rocky Nook, Inc.


